
Instructions
for BR-HD50U(A) Firmware Upgrade
-
- Improvements:
- The Firmware upgrade
improves:
- Compatibility with
Final Cut Pro and other non-linear video editing equipment.
- Time Code duplicate
feature in HDV mode.
-
Batch capturing.
-
Time Code reading at edit
points.
- Affected Models and Serial
Numbers
-
BR-HD50U before
XXXX0831
-
- Cautions
-
These
instructions must be carefully followed step by step in order to
successfully upgrade your BR-HD50U.
-
Before
the upgrade is attempted it is expected that you, the person doing
the upgrade, are able to read and understand the instructions as
they have been written.
- This
upgrade requires formatting the SD card. All data in the card that
is formatted will be lost.
-
In
the event that the upgrade is not successful your BR-HD50U will need
to be sent to JVC for repair.
- Requirements
-
Computer
with Windows XP or Mac operating system.
-
GY-HD100U,
this is used to format the SD Card. In the case
that a GY-HD100U is not available, a new SD Card or a card that has
never been formatted in a computer may be used. If using Windows
XP or 2000, you may also use a SD Card formatting utility that is
available at http://www.sdcard.org
.
-
Card
Reader/Writer (supplied by end user).
- SD
Card (supplied by end user) with a minimum of 8MB
capacity. JVC recommends the use of the SD Card that came with
GY-HD100U, or a 16MB or larger capacity card. Most cards should
work but it must be compatible with the SD card reader/writer and
the BR-HD50U.
- Preparation
-
Connect the Video Line Out
connector on the rear panel to a video monitor. Steps 2, 6, 7, and
10 will require the video monitor. See figure 1.
-
Version check: Turn the
power on. Press both the MENU and STOP buttons at the same time. If
the version is lower than 0106, then BR-HD50U needs the upgrade.
-
Format the SD card: All
data on the card will be lost in this step. Please back up your data
prior to formatting.
Insert the SD Card into the SD Card slot of the GY-HD100U and
follow the formatting instructions found on page 79 of the GY-HD100U
Instruction Manual. If using a new SD Card or a card that has never
been formatted in a computer, this step may be skipped. If using
Windows XP or 2000 the formatting tool found at
http://www.sdcard.org
may also be used. The SD Card will not be recognized by the
BR-HD50U if the card has been formatted by Windows or Mac operating
system native formatting utilities.
- Unzip and extract the
downloaded “BR-HD50U(A) Upgrade” file. Insert the SD
Card into the SD Card Reader/Writer attached to the computer. Then
copy and paste the extracted “br-hd50.up2” file
from the computer to the SD card. At this time there should only
be the firmware file on the card. The upgrade will not work properly
if there are other files on the card. Lock the SD card if there
is more than one unit to be upgraded.
- Instructions
-
With the BR-HD50
power turned off, use a #2 Phillips Head screwdriver to
remove the screw of the SD card slot cover on the rear cover of the
BR-HD50U and remove the cover. See figure 1.
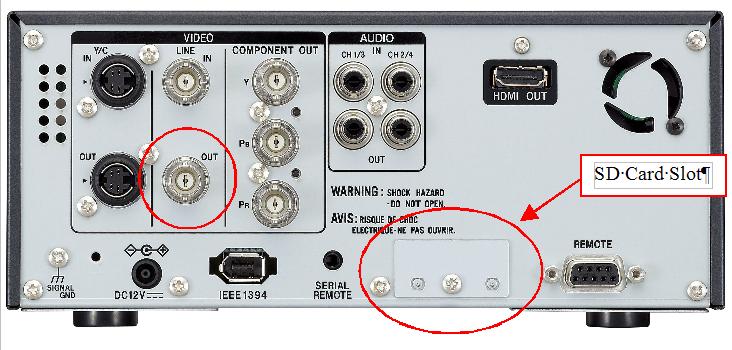
Fig. 1
- Insert the SD card
into the card slot of the BR-HD50U with the contacts of the SD card
facing towards the top of the unit. This slot is spring loaded.
Press the card in firmly and it will lock in place. To release the
card press firmly once again and it will be ready to remove.
-
Set the IEEE1394 switch
on the front panel to HDV and set the INPUT Select switch on the
front panel to Y/C. See figure 2.
-
Fig. 2
-
- Power the unit on. Do
not turn off, unplug, or allow the unit to lose power in any way
until the end of the upgrade. If the power or the upgrade is
interrupted in any way, the unit will need to be sent to JVC for
repair.
-
Simultaneously press the
REC, Pause, FF, and Menu buttons.
-
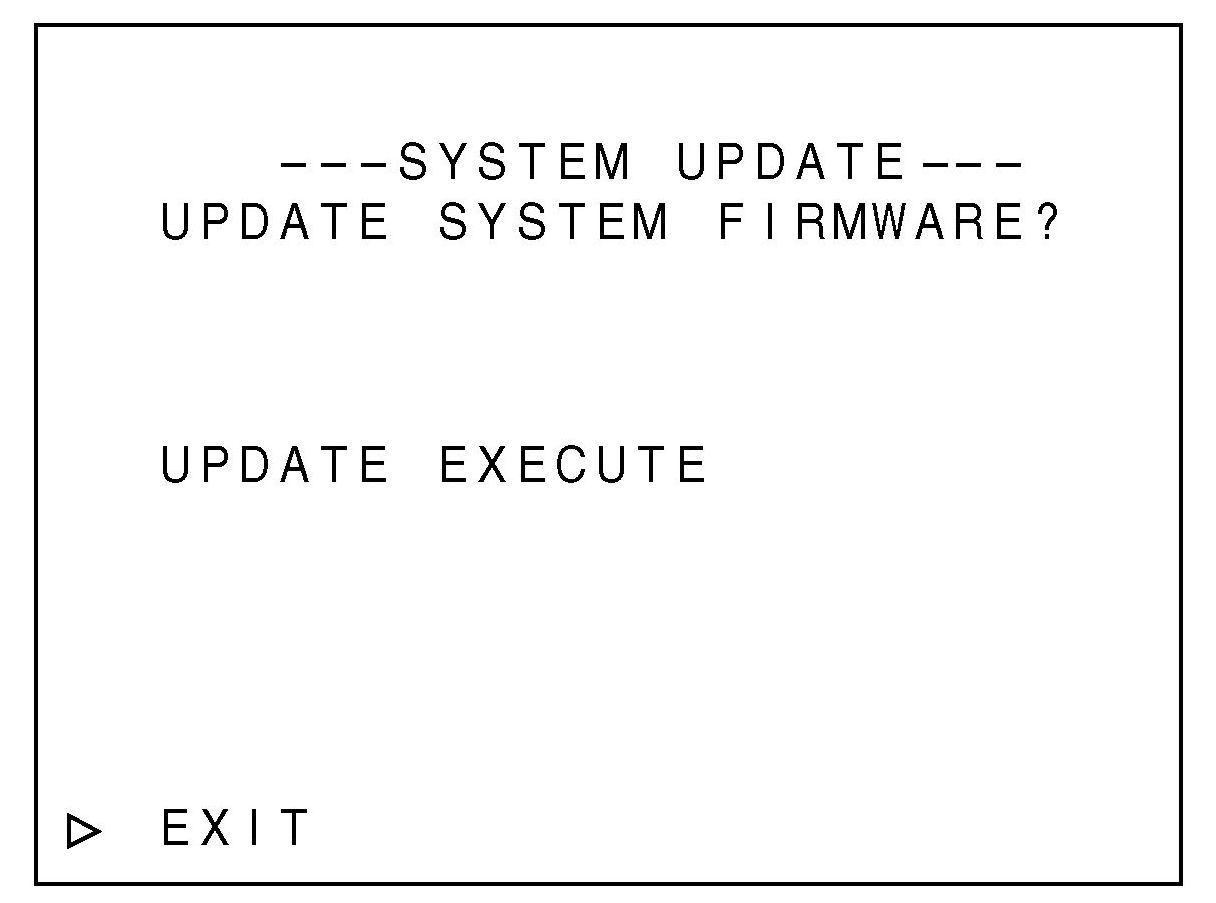
Press the ▲
or ▼ button
on the front panel to move the cursor to Upgrade Execute and press
the SET button. See figure 2.

-
Press the ▲
or ▼
button on the front panel to move the cursor to CONTINUE? and press
the SET button. The BR-HD50U will now begin updating.
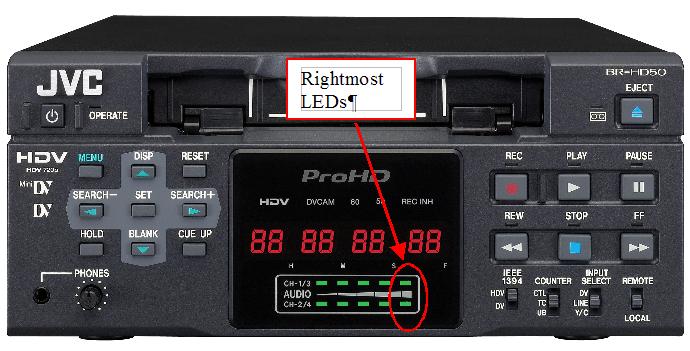
- When the
upgrade is completed after 7 to 10 minutes, both rightmost red LEDs
of Audio Ch-1/3 and CH-2/4 audio meters will blink simultaneously
at approximately 2 second interval. See
figure 2.
- Remove the SD Card
and the unit will return to the power off state. Replace the SD
card slot cover and screw.
-
Confirm version: Turn
the power on. Press both the MENU and STOP buttons at the same
time. Version 0106 should be displayed.
- Press the MENU button
to exit this screen and the unit is ready to use.
- In the event that
assistance is required please call 1-800-JVC-JVC5.
-
